- Head lamp bucket. - The black plastic bucket is cracked around the edges.
- Lower triple tree. - The left fork stop is sheared off allowing the reflector to hit the tank on full turn.
- Clutch lever housing. - The bottom housing is cracked (...now its just broke).
Wednesday, October 28, 2009
eBay is Cheap, Its the shipping that will kill you.
So a couple of boxes of eBay acquired parts showed up today. Joy and frustration in one swift motion. I was looking for a couple of parts to replce items damaged when the bike went into the neighbors bushes. I needed:
Monday, October 26, 2009
Turn Signals & Frankenbracket

In my opinion one of the clunkiest items on the stock CB200 are the lollipop turn signals. While some guys may opt to shave them off altogether we decided to keep the signals but to replace them with a set of smaller signals that look better. Mounting smaller lights on the front was a requirement because the stock signals ran into the Clubman handlebars.
I picked up two sets of these "retro" signals from my local m/c parts dealer. They were reasonable at $35 a set.

The front signals on the CB200 are single wire (hot) and the signals are grounded to the frame. These signals are two wire so the first step was to disassemble the lights and cut the black wire down. Next I soldered the ground wire to the spring that sits behind the bulb. The spring makes contact with the housing and the housing grounds to the headlamp mount. Chase the turn signal hot lead into the head lamp and plug in the red wires.
Next up are the rear signals. The stock units mount to the seat grab rail and are not grounded to the bike. We decided to remove both the grab rail and the rear fender and mount our signals in the frame holes where the fender was mounted.
First you need to remove the phillips-head screws that hold on the turn signals. Next loosen the shock mount cap bolts. This will allow the grab rail to slide back and away from the bike. The turn signal bullet connectors (light blue/orange) unplug from wire harness under the seat.
 If you want to keep your fender you'll need to make a bracket to bolt the signals to the fender. In our case we unbolted the two nuts on the side of the fender and then removed the two 10mm bolts under the seat and removed the whole fender. There is no need to remove the rear wheel but you do need to unplug the tail light wires from wire harness under the seat. There are 3 wires, brake light (green w/ yellow trace), running light (brown) and ground (green).
With the fender removed, I bolted the rear turn signals into the frame holes where the fender was through bolted. I used a couple of washers for each side made up the difference between the signal post diameter and the fender bolt holes. I had to extend the wires on the signals to reach the wire harness under the seat but then they were straight plug-in connections.
 Next up was the tail light. With the fender removed I needed to mount the tail light to the frame. I had a small-ish oval tail light from another project and I decided to bolt together a quick and dirty tail light and license plate bracket. I used a three 6" angle brackets and made a simple Frankenstein assembly. I used two of the brackets to make the main assembly and cut up the third bracket to make the ears and two cross braces. I bolted the whole thing together and drilled a couple of 1/4" holes in the frame seat hump.
The brake light has two hot leads, one is the running light, one is the brake light. I made ground wire with a eye on one end attached to one of the light's mounting bolts and a bullet on the other plugged in to the harness. I'm sure the tail light bracket will get replaced when we get the new seat sorted out but for now it works and makes the bike legal to ride.
Thursday, October 8, 2009
The Exhaust Conundrum
Next up is the exhaust pipes. The CB200 has one beautiful exhaust pipe and one that was patched with an aluminum plate at some previous repair session (before I had the bike). The aluminum plate patch busted and the recent return to the road has cause the muffler to sag. So we "removed" the muffler.
I've come to understand that these pipes are really hard to replace and I also believe they are a one piece pipe. The header and muffler are all one unit. Check out this parts diagram...
 Notice how there is a one next to the right pipe and a 2 next to the left pipe.
But there are no numbers on the headers? One piece.
So the conundrum is:
 Since the plan is to buy cool little shorty mufflers (about $25 a piece) that will make the CB200 almost as loud as the big bike. And to wrap the headers with... header wrap, to give it a little old-school bobber style...
 The cheapest solution is No.#1, quick, simple, efficient. No.#2 is out of the question because we want to ride it! Who knows when I could find one of these in good condition? (My thought is if I do come across one someday I would buy it in case we want to return the bike to stock. Again I know this is a sickness and it will never happen but its my way to justify storing a bunch of parts in the garage.) No.#3 is the best solution because it keeps option No.#2 in play, but it requires buying more parts on ebay...
Gotta go, I'm exhausted thinking about this and my auctions are closing soon...
co·nun·drum \kə-ˈnən-drəm\ noun a riddle whose answer is or involves a pun. co·nun·drum
I've come to understand that these pipes are really hard to replace and I also believe they are a one piece pipe. The header and muffler are all one unit. Check out this parts diagram...
 Notice how there is a one next to the right pipe and a 2 next to the left pipe.
But there are no numbers on the headers? One piece.
So the conundrum is:
- Do I cut off a perfectly good original Left muffler and replace both mufflers?
- Do I search for and wait until I find a good condition original Right muffler?
- Do I buy a trashed Right muffler/header on ebay and cut it up?
 Since the plan is to buy cool little shorty mufflers (about $25 a piece) that will make the CB200 almost as loud as the big bike. And to wrap the headers with... header wrap, to give it a little old-school bobber style...
 The cheapest solution is No.#1, quick, simple, efficient. No.#2 is out of the question because we want to ride it! Who knows when I could find one of these in good condition? (My thought is if I do come across one someday I would buy it in case we want to return the bike to stock. Again I know this is a sickness and it will never happen but its my way to justify storing a bunch of parts in the garage.) No.#3 is the best solution because it keeps option No.#2 in play, but it requires buying more parts on ebay...
Gotta go, I'm exhausted thinking about this and my auctions are closing soon...
co·nun·drum \kə-ˈnən-drəm\ noun a riddle whose answer is or involves a pun. co·nun·drum
Saturday, October 3, 2009
Clubman Part 2
Saturday morning time to finish the Clubman bars.
The first point of order is to prep the bars for the wiring. The bars we got ($28 including shipping on eBay) had no holes in them and had 10" arms.
 The cb200 with Clubman handlebars and getting a quick oil change. :)
The first point of order is to prep the bars for the wiring. The bars we got ($28 including shipping on eBay) had no holes in them and had 10" arms.
 Looking at the bike we felt the bars would be a little to wide so we cut 1-1/4 inches off each end. This was done by wrapping the bars with tape to mark the cut line and clamping them in a soft-jaw vice. A Dewalt reciprocating saw with a fresh blade made quick work of the cutting. We dressed the cut ends with a flat file on the outside edges and a round file on the inside to remove all sharp edges.

 Next we laid the old bars next to the new bars and marked the holes for drilling. Each housing has a "hockey-rink" hole for the wiring with a round hole that is for a pin on the hand control.
  The position of this hole determines where your grips clock. We transferred the hole patterns to the new bars and proceeded to cut them out. First I hit the bars on a grinding wheel at the place I wanted to cut my hockey-rink hole this created a flat spot to drill on. Then I hit the bars with a center punch once on the position hole and 3 times across the hockey-rink. We drilled the holes one at a time and opened the holes with progressively larger bits until the holes connected to each other. We finished opening the holes with a carbide burr bit.
 Finally we marked the center hole (where the wires exit) and drilled and burred the hole. After creating each hole we spent time hand filing each opening so there were no sharp edges to catch the wiring.


 The first order of business is to pull the wires attached to the hand controls in through our hockey-rink holes. The easiest way to do this is to get a 12" length of ball-chain. (I took my off the ceiling fan in our living room.) The cool thing about the chain is its heavy and will fall right into the bars. Also it will snake through almost any shape and fall out the hole on the other end. (Thanks Jim!) We used electrical tape and taped about 4" of chain to the wires. Try to get the bundle a small as possible. Start at the end of the chain about 4" before the end of the wiring. Then spiral-wrap tape down the harness tapering to the end. Feed the chain into the hockey-rink hole and out the center hole. Pull firmly as you push the harness into the hole. Squirt a little WD-40 to help it slide. We had to try this a couple times as it is tight and working the wiring past the 90deg bend in the Clubmans is a task.
- Reconnect the controls to the bars. Be careful not to pinch any wires, this is usually where people get shorts.
- Use a little more Windex and work the left grip onto the new bars. (Be careful on your test ride the Windex will take 24 hours to completely dry.)
- After trying to sandwich the clutch/brake cable in between the handlebars and the speedo/tach we found the brake cable was binding. So we fed the speedo/tach inside the clutch and brake cable and every thing worked fine.
- We reconnected the two bolts on the speedo/tach and then reconnected the handlebar clamps.
- We reconnected the headlamp ears to the headlight bucket and the reconnected the wires inside the headlight bucket. Ours were a color to color match except for one wire that had been previously spliced. But since we marked it and took a picture it was easy to remember where it went.
- We put the screws back in the headlamp bucket at 4 and 7 o'clock, reconnected the battery and waited for the moment of truth.
- We turned the key, headlamp on--check, neutral light on--check, hit the starter and the CB200 fired to life.
- We rechecked all out bolts (especially the bar clamps) and took the CB200 for a test flight.

 The cb200 with Clubman handlebars and getting a quick oil change. :)
Friday, October 2, 2009
Clubman Bar Conversion
The first modification for the CB200 was the handlebars. I like the more aggressive look and riding position of the Clubmans, plus they make your bike go faster. I'm not kidding. With the stock bars and upright riding position, the air you catch in your chest significantly slows down the bike and causes rider fatigue. The Clubmans get you down out of the wind and give you a little extra weight on the front tire at speed.
Step 1 Disassembly
Seems like a reasonable thing to do on a Friday night...

Step 1 Disassembly
Seems like a reasonable thing to do on a Friday night...

- Disconnect the battery.
- Remove the mirrors. They are held on with jamb nuts, loosen the nut and then unscrew the whole mirror assembly.
 First you pull the headlamp out of the housing two screws at 4 and 7 o'clock allow you to drop the headlight. (That's one screw removed at 4 pm, discussion about how good these new handlebars will look and then one screw removed at 7 pm. Based on this "bench-racing" method you'll see how long this project takes.) Lay a towel on the fender to sit the headlamp on.
- Unbolt the two nuts that hold the bucket on the ears and lay the bucket down with the lamp.
- Unbolt the riser caps. This will allow the bars to be free. Lay a towel on the tank and lay down the bars.
 Unbolt the two nuts that hold the speedo/tach cluster and lay it down with the headlamp.
 - Next trace the two wire bundles that come out of the bottom of the handlebars into the headlamp bucket. Disconnect the wires at the pig-tails. Honda color co-ordinated all the wires which makes this pretty easy. But... chances are someone else has already been in this bucket and if any wires have been replaced you may not have matching colors. So this is a good time to tag every wire and take some pictures.
 Remove the rubber boots off the controls. Our bike had one. It was held on with zip ties around the wires. We cut the zip ties and carefully pulled the boot off over the brake lever.
- Release the handlebar controls. There are 2 screws in the bottom of each control.
- When you release the right control the throttle will slide off. You have to lineup the throttle cable with the slot in the grip and you can side out the cable end. The left side grip will come off with a little effort. Use Scooters trick, pryup the grip with a small screwdriver or awl and spray some Windex on the bar. Work the grip off as you spray on more Windex.
 Each hand control has a bundle of wires that go into the handlebar and exit a hole in the center. Earlier you disconnected the ends of these wires inside the headlamp. Now you gently pull the wires out of the hand control holes in the bars. (You do not disconnect the wiring in the hand controls.) Doing this requires a firm pull, but don't tear them out. To ease the pain you can spray some wd40 in the bars. Ours came out fairly easily, but I've heard/read horror stories.
- At this point you have a mess.


Thursday, October 1, 2009
How to Get your CB200 Running
What you need to do to get your Honda CB200 Running
 Clean the Carbs - fully disassemble and clean everything with carburetor cleaner. Take out all the brass parts (jets, float valve, etc.) clean or replace everything.
- I used a welders "Tip Cleaner" set. Find a welding supply store in your area and ask for a torch tip drill set. You'll get about fifteen drill bits housed in a pin vise from .0625 (1/16th) down to super small for about seven or eight bucks and they are very high quality. This will allow you to clean every passage in the carb.
 Soak the stripped down carbs overnight in a carb cleaning solution. Berryman / 1 gal. B-9 carburetor and parts cleaner with basket is $20 at AutoZone. Warning it will eat all rubber.
- Reassemble the carbs with a pair of Quality Keyster carb repair/rebuild kit made in Japan $22 each from Out West Motorcycles.
- I used a welders "Tip Cleaner" set. Find a welding supply store in your area and ask for a torch tip drill set. You'll get about fifteen drill bits housed in a pin vise from .0625 (1/16th) down to super small for about seven or eight bucks and they are very high quality. This will allow you to clean every passage in the carb.
- Drain Gas tank - clean and refill
- Remove your tank... close the petcock, pull the fuel lines, open the seat, pull back the harness at the rear of the tank, lift and slide the tank back. (No tools.)
- Empty the contents into a container. This will be varnished gas and rust.
- Remove the petcock from the bottom of the tank. the 75 uses a Phillips-head screw.
- Fill the tank with water and empty multiple times. This will float out the big loose stuff.
- Reinstall the petcock.
- Pour a pint of liquid degreaser full strength and a couple 8" lengths of medium size linked chain into the tank and slosh vigorously with all the openings capped off. (There are people who will put screws/nuts/bolts in the tank, other people report losing/not recovering all the bolts. Use a couple of chains so can make sure you get them out when you are done.)
- Add a 1/2 gallon of the hot water to the degreaser still in the tank and slosh it around again for a few minutes.
- Empty the tank, remove the chains.
- If you still have rust, fill the tank with Vinegar, let it sit overnight and then empty. Do this several times until the vinegar coming out is clear.
 Finally pour about a tablespoon of hand dishwashing liquid and about a gallon of very hot water into the tank and slosh thoroughly. Dry the tank.
- Remove the petcock, disassemble and clean thoroughly.
- Kreem the tank
- Reinstall petcock, fill with new fuel.
- Replace fuel lines with inline fuel filters.
 Change the oil. Your CB200 uses 3.6 pints (1.75 Quarts) of 10W-40. There's a large nut at the bottom of the motor. Remove that with a 19mm socket to drain the oil. There is no oil "filter" as it is equipped with a centrifugal oil filter in the motor.
- New battery - The bike came stock with the YuasaMBW3-12C. Get the Yuasa YB9-B from your local dealer, its about $30. They will fill it with acid and do the first charge on it for you. Don't think you need a new battery? Here's some good advice. http://en.allexperts.com/q/Motorcycle-Repair-837/1975-Honda-CB200-Electrical-1.htm
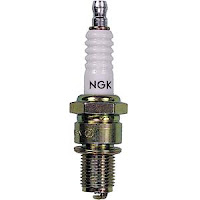 New plugs - While your at the dealer pick up a new set of spark plugs. NGK D-8ES-L. If your motor has been sitting a long time while you have the plugs out you can spray a little penetrating oil inside chamber & rotate engine without the plugs in. Let this sit for 24 hours before firing the bike up.
- Check the tires and pressure. Old cracked tires on motorcycles spell potential disaster, one of the first things you'll want to do is to replace the tires. Use 80/100H-18 in the front and 90/90H-18 in the rear. At the very least check the tire pressure in the old tires 26 PSI in the front 28 PSI in the rear.
- Lube the chain. If you need to clean the chain stay away from WD-40, remove it and soak it in Kerosene. Lube the chain with a good quality chain lube and you'll be good to go!


It lives!
When we "stored" the CB200 it was running good. I turned off the petcock and proceeded to move it around the garage for 6 years occasionally wiping off the top layer of dust.
Ed Note: This is not the correct procedure for storing a motorcycle nor is it the correct procedure for starting a motorcycle that has been sitting for years.
First the throttle wouldn't turn. It was stuck. I followed the cables down to the carburetors and the left one would pull out the slide the right one was stuck. I unscrewed the cap and realized the fuel had varnished in the carburetor. I decided to remove the carb and give it a "good" cleaning.
 How to remove a carb on the CB200
There are a pair of Phillips head screws that hold the carburetor onto the intake runners. I found that a 1/4 wrench with a Phillips bit taped into the closed end of the wrench gave me a short enough throat (my fancy dual 90 Phillips head screw driver was too long the bend ran into the intake bolts.) and the angle of the wrench was perfect so I could actually turn the screws a quarter turn at a time. Its not fast but the more you do it (and believe me you will do it a lot) you'll get faster.
Once I had off the carburetor unscrewed from the intake I was able to put a little gas into top of the carb and put a screwdriver in through the air intake and pushed the slide out of the top. It was n't pretty but I got the carb off the bike and wiped it down, cleaned the slide and put it back together.
Do as I say not as I do.
If you are here stop. Pull the tank and petcock, pull both carbs do a real cleaning. Get a couple of rebuild kits and do it right the first time. You might as well because as this story goes on I will R&R the tank and the carbs multiple times and eventually do it right.
The throttle cable was free and I could twist it as designed! I turned on the petcock and tried the electric starter. Click, click, click. So down the street like the Jamaican bob sledding team. Run, jump on, second gear, pop the clutch. Pop, pop, sputter, sputter, seemed to run for about 3 seconds then nothing.
I hooked-up the battery up to a charger over night and did the same drill the next day. Click, click, click. So down the street like the Jamaican bob sledding team. Run, jump on, second gear, pop the clutch. Pop, pop, sputter, sputter, seemed to run for about 6 seconds the nothing.
The next day I sent my son to the local Honda dealer who ordered a $30 battery for us and the guy at thee parts counter told him all about the CB200 he had when he was younger. He rode his to Joshua tree with a bunch of "big" bikes. He said had it pegged at 70mph the whole way but he kept up! (People... ok young people, actually ride these things.)
While we were waiting for the battery to come in we decided to see what was in the fuel tank. So we removed the tank. (Open the seat, pull back the rubber saddle, pull the fuel lines of the petcock, pull the tank back. Easy, no tools necessary. Gotta love Honda engineers.) I dumped the tank into a clear plastic container. It didn't look like gas, it didn't smell like gas, it was a reddish-brown varnish.
As gas sits it evaporates leaving behind the other stuff in gas, mix that with rust in the tank and you have a toxic waste dump. The fact that the Honda "ran" for 9 seconds on this crap is a miracle. I removed the petcock and we flushed the tank with water and floated all the crap out of the tank. I disassembled the petcock and found it was all gummed up with the reddish-brown varnish I saw on the carb slide. I got it all cleaned up pretty good and we put it all back together.
 It lives.
When the battery came in we went down to the gas station and got a gallon of premium (only the best, right?) we hooked up the fresh battery (the dealer filled it with acid and charged it for us.) Guess what? It fired right up. We took it for a spin around the block and felt a sense of accomplishment. The only problem, it ran like crap and immediately fouled the right plug.
Here's some good advice:
http://en.allexperts.com/q/Motorcycle-Repair-837/CB200T-Engine-miss.htm
Subscribe to:
Posts (Atom)